Windows Hello for Business: Registration and Authentication with #AzureAD

Something that has come up recently in my conversations with you has been how Windows Hello for Business works behind the scenes. I am very excited as more organizations are looking into deploying Windows Hello for Business and some even trying to go password-less. I’ll use this short post to explain how the credential is provisioned and how is it used upon authentication in Windows.


Provisioning

Windows 10 devices that are joined (hybrid Azure AD joined, or Azure AD joined) will provision this credential upon user first logon, when the user is provisioning the Windows Hello for Business gesture (PIN, fingerprint, facial recognition) (there are more details about when this happens in this post). I won’t get into the details of the experience but will rather go in detail on what keys are generated, how they are used and what state is stored in the directory.

(1) Before the user provisions the gesture, the following has been generated in the device:

  • The Attestation Identity Key or AIK certificate. Let’s call it AIK-cert.
  • A private-public key pair (RSA 2048 bit) representing the new credential that will be associated with the user, and its corresponding attestation blob (which attests that the key has been generated in the TPM of the device). Let’s call it Kuser (Kuser-pri or Kuser-pub depending on the context).

(2) Also, the following has been provisioned previously as part of device registration (when the device become joined to Azure AD):

  • A private-public key pair registered to the device (in addition to the device certificate key) that is going to be used to protect SSO tokens on the device by storing authentication session keys in the TPM, usually referred as storage key. The private portion of the key stays at the TPM of the device while the public portion was provisioned in Azure AD against the device object representing the device. Let’s call it Kstk (Kstk-pri or Kstk-pub).

(3) When the user provisions the gesture the following occurs:

  • The user must have provided multi-factor authentication (MFA). The device gets an access token to Azure DRS using this authentication.
  • The Kuser-pri is cryptographically protected to the gesture the user provisioned (this is what we usually have called a virtual container, where the key is put, being the gesture the key that opens the container).
  • The Kuser-pub along with the key attestation blob, the AIK-cert, and the access token are sent to Azure DRS for registration of the key.
  • Azure DRS validates the access token and uses the AIK-cert to validate the attestation blob of Kuser (this validates that the key was generated on a valid TPM).
  • The Kuser-pub is registered to the user object in Azure AD and it is associated with the device object.
  • Azure DRS returns a key ID to the client which the client stores.

(4) If certificate-based provisioning via AD FS has been enabled, for on-premises SSO, the following happens:

  • A certificate signing request is sent to AD FS. AD FS acts as a Registration Authority (RA) and tells the Certificate Authority (CA) in the enterprise to issue the certificate.


Authentication

Upon sign-in to Windows, when the user enters the gesture to unlock the credential, the following happens:

  1. The Cloud Authentication Provider plug-in for Azure AD (a.k.a. client) sends a “hello” request to Azure AD. This is basically an empty OAuth request, to which Azure AD responds with a nonce valid for 5 minutes.
  2. Client signs the nonce with Kuser-pri and sends an authentication request to Azure AD with it.
  3. Azure AD verifies the signature of the payload using the registered previously Kuser-pub in the user object. After verification of the signature, it verifies the nonce.
  4. Azure AD replies with the Primary Refresh Token (PRT) and includes a symmetric service key encrypted using the Kstk-pub (the one created and provisioned during device registration).
  5. Client decrypts and imports service key into TPM using the Kstk-pri.

Once the PRT is obtained and the user wants to have access to an application the following happens (this is true regardless of how the PRT was obtained, including using username and password):

  1. The Web Account Manager plug-in for Azure AD (a.k.a. client) derives a new service key from the previous service key Ksk using a ‘salt’. Let’s call it Ksk’.
  2. The client sends the ‘salt’ and the authentication request for an access token signed with the new Ksk’.
  3. Azure AD verifies signature and derives a new key with a new ‘salt’. Let’s call it Ksk’’. It sends the access token back to the client signed by the Ksk’’, including the ‘salt’.
  4. Client verifies signature and gets access token.


Authentication and hybrid Azure AD joined devices

There are some considerations during authentication for hybrid Azure AD joined devices (on-premises domain joined that are registered with Azure AD) that you may find interesting to have in mind when deploying Windows Hello for Business.

Let’s see where this happens in the authentication flow. Remember the picture below from this post? (Notice now that the picture has been slightly adjusted to reflect Windows Hello for Business.)

SignInFlowWinHello

For hybrid Azure AD joined devices the left part (Kerberos auth) happens first. Given how Kerberos auth works, if a user certificate for the Hello credential has not been provisioned, the first authentication of that user with the Hello gesture will fail and the user won’t have access to the device. No cloud authentication happens either, so no PRT is obtained.

If a Hello certificate has been provisioned, the first sign in of the user with the Hello gesture must occur within line of sight to a domain controller (DC). In other words the user must be physically on-premises, or must have a connection to the corporate network via VPN (after being signed in using username/password) and unlocking the device using Hello. Once the user has signed in to the device, cached logon will allow the user to get access to the device if the user is outside of the network.

  • Note that you can force the user to do a full network authentication every now and then to block access to the device, but this will require the user to come to the corporate network as often as you require so.

Once the Kerberos auth succeeds (either via full network or cached logon) the device will authenticate the Hello key against Azure AD every 4 hours to obtain a new PRT. Please note that unlike username/password, authentication of Hello doesn’t require going to AD FS (in a federated configuration) as all that Azure AD is proving is that the device has possession of the private key.

Remember that the credential is NOT in Azure AD or AD on-prem, the credential never leaves the device, and all Azure AD needs, is making sure the device really holds that credential. This is different from the username/password case where the actual credential is in Azure AD or AD on-prem, therefore to validate it, the full credential needs to flow through the network for validation. In a federated configuration this means that AD FS needs to be in the auth path to verify the credential with AD on-prem.


Securing your authentication with Azure AD

For securing your authentication you should have in mind the following considerations:

  1. Always protect your applications and resources with MFA- and device-based Azure AD conditional access. Remember that Windows Hello for Business is a strong credential that fulfills MFA.
  2. In addition you can protect them using risk-based conditional access with Azure AD Identity Protection.
  3. In the case you need to revoke access to a given user who has provisioned Windows Hello for Business you can:
    1. Disable the user and/or device in Azure AD.
    2. Revoke user tokens.


Well, that’s it for now. I hope this post will help with your security reviews and just about learning how Windows Hello for Business works. Please let me know your questions or thoughts!

Jairo (Twitter: @JairoC_AzureAD)

Posted in Uncategorized | 9 Comments

#AzureAD device-based conditional access and #Windows 7/8.1

In this post I will cover how you can enable your Windows 7/8.1 and Server 2008 R2/2012/2012 R2 computers to participate in Azure AD conditional access. Domain joined computers must register with Azure AD for meeting device-based conditional access policies like “require domain joined device (hybrid Azure AD)” for protecting access to Office 365, SaaS apps, or on-premises apps published through the Azure AD application proxy.

Both federated and non-federated organizations can register their domain joined computers. Until recently, only federated configurations were able to do it, but now non-federated (i.e. without an on-premises STS like AD FS for authentication to Azure AD) can do it as well via Azure AD Seamless SSO and an up-to-date version of the Windows Installer package (.msi) to support non-Windows 10/Server 2016 device registration.

For more information on how to configure domain joined devices for Azure AD conditional access see how to configure hybrid Azure AD joined devices.


The Windows Installer package (.msi), the task and AutoWorkplaceJoin.exe

You need to deploy the package to your Windows 7/8.1 domain joined computers (for example using System Center Configuration Manager). The package will install a task that you can see in Task Scheduler under Microsoft > Workplace Join.

The task will trigger upon user sign-in to Windows (i.e. “At log on”) (and retry at 1 minute and 5 minutes if registration hasn’t succeeded before) and unlock. The task will trigger if network is available.

When the task triggers, it runs the tool AutoWorkplaceJoin.exe under %SystemRoot%\Microsoft Workplace Join. This tool will do the following:

  1. Queries AD on-premises to get the tenant domain name to be used for discovery. It does this by querying the AzureAdName value in the keywords attribute of the Service Connection Point (SCP) object in the following location (please note that this is the object that is also used in the Windows 10 case):
    CN=62a0ff2e-97b9-4513-943f-0d221bd30080,CN=Device Registration Configuration,CN=Services,[Your Configuration Naming Context]
  2. Gets the authorization and token URLs plus registration service information (URL and identifier of Azure Device Registration Service or Azure DRS) by sending a request to the discovery end-point in Azure DRS. This allows support for devices in organizations in specific clouds (e.g. government clouds). If the AzureAdName value is contoso.com the request would look as follows:
    GET https://enterpriseregistration.windows.net/contoso.com/EnrollmentServer/Contract?api-version=1.2
  3. Launches a hidden Internet Explorer browser window and navigates to Azure AD requesting an OAuth code to then request an access token to Azure DRS using the information obtained from the discovery payload:
    GET https://login.microsoftonline.com/contoso.com/oauth2/authorize
    ?response_type=code
    &client_id=dd762716-544d-4aeb-a526-687b73838a22
    &resource=urn:ms-drs:enterpriseregistration.windows.net
    &redirect_uri=ms-app://windows.immersivecontrolpanel/
    &domain_hint=contoso.com
  4. Sends the OAuth code to the token end-point (obtained from discovery) to get an access token to Azure DRS.
  5. Sends a request to Azure DRS (URL obtained from discovery) with token obtained to perform device registration.

Now, depending on whether the Azure AD configuration is federated, or non-federated with Seamless SSO enabled, the process of obtaining the OAuth code (step #3) will vary.


Authentication for registration using AD FS (federated)

The following illustrates how authentication works in a federated configuration through AD FS when registering the device with Azure AD.

  1. Win7-HAADJ-registration-ADFS.pngUser signs in to Windows and task runs. A hidden Internet Explorer browser is launched and the OAuth code authentication request is sent to Azure AD.
  2. Azure AD redirects browser to AD FS via an HTTP 302 Found response. The browser will authenticate to AD FS using Integrated Windows authentication. Given the resource_params parameter passed in the authentication request, a successful Integrated Windows authentication will be treated as a strong one (i.e. multi-factor authentication or MFA). This is to meet the Azure AD policy for device registration which by default requires MFA. The value of the resource_params parameter contains the following value in an encoded string:
    {"Properties":[{"Key":"acr","Value":"wiaormultiauthn"}]}

    Please note that AD FS must have configured a particular issuance transform rule to include in the token the wiaormultiauthn claim. For more information on the claim needed see how to configure hybrid Azure AD joined devices.

  3. The browser sends the SAML assertion up to Azure AD. Azure AD accepts it as valid for registration as the following claims are present:
    http://schemas.microsoft.com/ws/2008/06/identity/authenticationmethod/windows
    http://schemas.microsoft.com/claims/wiaormultiauthn
  4. Azure AD authenticates the user with the SAML assertion received and returns the OAuth code to the client. The client goes back to Azure AD to get an access token to Azure DRS passing the OAuth code obtained.
  5. The client goes to Azure DRS with the access token obtained to do device registration.


Authentication for registration using Azure AD Seamless SSO (non-federated)

The following illustrates how authentication works in a non-federated configuration through Azure AD Seamless SSO when registering the device with Azure AD.

  1. Win7-HAADJ-registration-S-SSOUser signs in to Windows and task runs.
  2. A hidden Internet Explorer browser is launched and the OAuth code authentication request is sent to Azure AD.
  3. Azure AD, knowing that Seamless SSO has been enabled, will return an HTTP 401 Unauthorized message with the header WWW-Authenticate as Negotiate, just as any web application using Integrated Windows authentication would do.
  4. The client will reach out to AD on-premises to get a Kerberos ticket to the Azure AD HTTP Service Principal Name (SPN). It uses the current user context to obtain the token silently.
  5. The client replays the authentication request to Azure AD but this time with the Kerberos ticket in the Authorization header.
  6. Azure AD can validate the Kerberos ticket as it has the “service account” secret for the corresponding SPN in AD on-premises. After authentication it will return the OAuth code to the client. The client goes back up to Azure AD with the OAuth code to the token end-point to get an access token to Azure DRS.
  7. The client goes to Azure DRS with the token obtained to do device registration.


Device registration

If you have read through the Azure AD Join: What happens behind the scenes and How Domain Join is different in Windows 10 with Azure AD posts you would have learned how device registration works in Windows 10. You will notice that the mechanisms used for registration are very similar:

  1. The client generates a private/public key pair and sends a Certificate Signing Request with the public key to Azure DRS along with the access token obtained.
  2. Azure DRS authorizes the token, creates a certificate, create a device object with its the certificate thumbprint associated to it and then returns the certificate to the client.
  3. The client stores the certificate in the user MY store.

Windows 10 in addition generates a key that will be used to protect the SSO token obtained during user sign-in to Windows (i.e. Primary Refresh Token). This doesn’t happen on the Windows 7/8.1 case. For more information see how SSO works in Windows 10 devices.


Device authentication

After the device has been registered, every request for authentication to an application protected with Azure AD device-based conditional access policies, will trigger device client TLS authentication which will allow the device to present the certificate to Azure AD. Azure AD will look for a corresponding device object and authenticate/authorize it for access appropriately. Please note that Windows 10 doesn’t use client TLS for device authentication. For more information see how SSO works in Windows 10 devices.


Alright, that’s it for this post. Thanks for your interest in bringing your devices to Azure AD for device-based conditional access and other cool capabilities. Please let me know if you have any questions or comments.

See you soon!

Jairo (Twitter: @JairoC_AzureAD)

Posted in #AzureAD Seamless SSO, AD FS, Device Conditional Access, Device Registration, Domain Join | 13 Comments

How SSO works in Windows 10 devices

In a previous post I talked about the three ways to setup Windows 10 devices for work with Azure AD. I later covered in detail how Azure AD Join and auto-registration to Azure AD of Windows 10 domain joined devices work, and in an extra post I explained how Windows Hello for Business (a.k.a. Microsoft Passport for Work) works. In this post I will cover how Single Sign-On (SSO) works once devices are registered with Azure AD for domain joined, Azure AD joined or personal registered devices via Add Work or School Account.

SSO in Windows 10 works for the following types of applications:

  1. Azure AD connected applications, including Office 365, SaaS apps, applications published through the Azure AD application proxy and LOB custom applications integrating with Azure AD.
  2. Windows Integrated authentication apps and services.
  3. AD FS applications when using AD FS in Windows Server 2016.


The Primary Refresh Token

SSO relies on special tokens obtained for each of the types of applications above. These are in turn used to obtain access tokens to specific applications. In the traditional Windows Integrated authentication case using Kerberos, this token is a Kerberos TGT (ticket-granting ticket). For Azure AD and AD FS applications we call this a Primary Refresh Token (PRT). This is a JSON Web Token containing claims about both the user and the device.

The PRT is initially obtained during Windows Logon (user sign-in/unlock) in a similar way the Kerberos TGT is obtained. This is true for both Azure AD joined and domain joined devices. In personal devices registered with Azure AD, the PRT is initially obtained upon Add Work or School Account (in a personal device the account to unlock the device is not the work account but a consumer account e.g. hotmail.com, live.com, outlook.com, etc.).

The PRT is needed for SSO. Without it, the user will be prompted for credentials when accessing applications every time. Please also note that the PRT contains information about the device. This means that if you have any device-based conditional access policy set on an application, without the PRT, access will be denied.


PRT validity

The PRT has a validity of 90 days with a 14 day sliding window. If the PRT is constantly used for obtaining tokens to access applications it will be valid for the full 90 days. After 90 days it expires and a new PRT needs to be obtained. If the PRT has not been used in a period of 14 days, the PRT expires and a new one needs to be obtained. Conditions that force expiration of the PRT outside of these conditions include events like user’s password change/reset.

For domain joined and Azure AD joined devices, renewal of the PRT is attempted every 4 hours. This means that the first sign-in/unlock, 4 hours after the PRT was obtained, a new PRT is attempted to be obtained.

Now, there is a caveat for domain joined devices. Attempting to get a new PRT only happens if the device has a line of sight to a DC (for a Kerberos full network logon which triggers also the Azure AD logon). This is a behavior we want to change and hope to make for the next update of Windows. This would mean that even if the user goes off the corporate network, the PRT can be updated. The implication of this behavior today, is that a domain joined device needs to come into the corporate network (either physically or via VPN) at least once every 14 days.


Domain joined/Azure AD joined devices and SSO


The following step-by-step shows how the PRT is obtained and how it is used for SSO. The diagram shows the flow in parallel to the long standing Windows Integrated authentication flow for reference and comparison.

sso-in-windows-10


(1) User enter credentials in the Window Logon UI

In the Windows Logon UI the user enters credentials to sign-in/unlock the device. The credentials are obtained by a Credential Provider. If using username and password the Credential Provider for username and password is used, if using Windows Hello for Business (PIN or bio-gesture), the Credential Provider for PIN, fingerprint or face recognition is used.

credprov


(2) Credentials are passed to the Cloud AP Azure AD plug-in for authentication

The Credential Provider gets the credentials to WinLogon which will call LsaLogonUser() API with the user credentials (to learn about the authentication architecture in Windows see Credentials Processes in Windows Authentication). The credentials get to a new component in Windows 10 called the Cloud Authentication Provider (Cloud AP). This is a plug-in based component running inside the LSASS (Local Security Authority Subsystem) process with one plug-in being the Azure AD Cloud AP plug-in. For simplicity in the diagram these two are shown as one Cloud AP box.

The plug-in will authenticate the user against Azure AD and AD FS (if Windows Server 2016) to obtain the PRT. The plug-in will know about the Azure AD tenant and the presence of the AD FS by the information cached during device registration time. I explain this at the end of step #2 in the post Azure AD Join: what happens behind the scenes? when the information from the ID Token is obtained and cached just before performing registration (the explanation applies to both to domain joined devices registered with Azure AD and Azure AD joined devices).


(3) Authentication of user and device to get PRT from Azure AD (and AD FS if federated and version of Windows Server 2016)

Depending on what credentials are used the plug-in will obtain the PRT via distinct calls to Azure AD and AD FS.

PRT based in username and password

To obtain the Azure AD PRT using username and password, the plug-in will send the credentials directly to Azure AD (in a non-federated configuration) or to AD FS (if federated). In the federated case, the plug-in will send the credentials to the following WS-trust end-point in AD FS to obtain a SAML token that is then sent to Azure AD.

adfs/services/trust/13/usernamemixed

Note: This post has been updated to reflect that the end-point used is the usernamemixed and not the windowstransport as it was previously stated.

Azure AD will authenticate the user with the credentials obtained (non-federated) or with verifying the SAML token obtained from AD FS (federated). After authentication Azure AD will build a PRT with both user and device claims and will return it to Windows.

PRT based in the Windows Hello for Business credential

To obtain the Azure AD PRT using the Windows Hello for Business credential, the plug-in will send a message to Azure AD to which it will respond with a nonce. The plug-in will respond with the nonce signed with the Windows Hello for Business credential key.

Azure AD will authenticate the user by checking the signature based on the public key that it registered at credential provisioning as explained in the post Azure AD and Microsoft Passport for Work in Windows 10 (please note that Windows Hello for Business is the new name for Microsoft Passport for Work). The PRT will contain information about the user and the device as well, however a difference with the PRT obtained using username and password is that this one will contain a “strong authentication” claim.

"acr":"2"


Regardless of how the PRT was obtained, a session key is included in the response which is encrypted to the Kstk (one of the keys provisioned during device registration as explained in step #4 in the post Azure AD Join: what happens behind the scenes?).

The session key is decrypted by the plug-in and imported to the TPM using the Kstk. Upon re-authentication the PRT is sent over to Azure AD signed using a derived version of the previously imported session key stored in the TPM which Azure AD can verify. This way we are bounding the PRT to the physical device reducing the risk of PRT theft.


(4) Cache of the PRT for the Web Account Manager to access it during app authentication

Once the PRT is obtained it is cached in the Local Security Authority (LSA). It is accessible by the Web Account Manager which is also a plug-in based component that provides an API for applications to get tokens from a given Identity Provider (IdP). It can access the PRT through the Cloud AP (who has access to the PRT) which checks for a particular application identifier for the Web Account Manager. There is a plug-in for the Web Account Manager that implements the logic to obtain tokens from Azure AD and AD FS (if AD FS in Windows Server 2016).

You can see whether a PRT was obtained after sign-in/unlock by checking the output of the following command.

dsregcmd.exe /status

Under the ‘User State’ section check the value for AzureAdPrt which must be YES.

prtindsregcmd

A value of NO will indicate that no PRT was obtained. The user won’t have SSO and will be blocked from accessing service applications that are protected using device-based conditional access policy.


A note on troubleshooting

To troubleshoot why the PRT is not obtained can be a topic for a full post, however one test you can do is to check whether that same user can authenticate to Office 365, say via browser to SharePoint Online, from a domain joined computer without being prompted for credentials. If the UPN suffix of users in Active Directory on-premises don’t route to the verified domain (alternate login ID) please make sure you have the appropriate issuance transform rule(s) in AD FS for the ImmutableID claim.

One other reason that I have seen PRT not being obtained, is when the device has a bad transport key (Kstk). I have seen this in devices that have been registered in a very early version of Windows (which upgraded to 1607 eventually). As the PRT is protected using a key in the TPM this could be a reason why the PRT is not obtained at all. One remediation for this case is to reset the TPM and let the device register again.


(5, 6 and 7) Application requests access token to Web Account Manager for a given application service

When a client application connects to a service application that relies in Azure AD for authentication (for example the Outlook app connecting to Office 365 Exchange Online) the application will request a token to the Web Account Manager using its API.

The Web Account Manager calls the Azure AD plug-in which in turn uses the PRT to obtain an access token for the service application in question (5).

There are two interfaces in particular that are important to note. One that permits an application get a token silently, which will use the PRT to obtain an access token silently if it can. If it can’t, it will return a code to the caller application telling it that UI interaction is required. This could happen for multiple reasons including the PRT has expired or when MFA authentication for the user is required, etc. Once the caller application receives this code, it will be able to call a separate API that will display a web control for the user to interact.

WinRT API

WebAuthenticationCoreManager.GetTokenSilentlyAsync(...) // Silent API
WebAuthenticationCoreManager.RequestTokenAsync(...) // User interaction API

Win32 API

IWebAuthenticationCoreManagerStatics::GetTokenSilentlyAsync(...) // Silent API
IWebAuthenticationCoreManagerInterop::RequestTokenForWindowAsync(...) // UI API


After returning the access token to the application (6), the client application will use the access token to get access to the service application (7).


Browser SSO

When the user accesses a service application via Microsoft Edge or Internet Explorer the application will redirect the browser to the Azure AD authentication URL. At this point, the request is intercepted via URLMON and the PRT gets included in the request. After authentications succeeds, Azure AD sends back a cookie that will contain SSO information for future requests. Please note that support for Google Chrome is available since the Creators update of Windows 10 (version 1703) via the Windows 10 Accounts Google Chrome extension.

Note: This post has been updated to state the support for Google Chrome in Windows 10.


Final thoughts

Remember that registering your domain joined computers with Azure AD (i.e. becoming Hybrid Azure AD joined) will give you instant benefits and it is likely you have everything you need to do it. Also, if you are thinking in deploying Azure AD joined devices you will start enjoying some additional benefits that come with it.

Please let me know you thoughts and stay tuned for other posts related to device-based conditional access and other related topics.

See you soon,

Jairo Cadena (Twitter: @JairoC_AzureAD)

Posted in Uncategorized | 79 Comments

Azure AD and Microsoft Passport for Work in Windows 10

One of the benefits of Windows 10 devices that are registered with Azure AD is the convenience and security that comes with Windows Hello and Microsoft Passport for Work. In this post I’ll delve into the technology of Microsoft Passport for Work with Azure AD and how it relates to devices and strong user authentication.

Microsoft Passport for Work is supported on all three types of devices registered with Azure AD to authenticate to work apps. In this post I will focus primarily on Azure AD joined and domain joined devices.

Quick note on personal devices

For Windows personal devices running the November 2015 update, Microsoft Passport for Work is limited to protecting certificates for traditional apps (like VPN) with the associated user’s gesture that unlocks the credential (read further in this post for details). These certificates are deployed typically by the Mobile Device Management (MDM) system.

The Microsoft Passport for Work provisioning experience won’t show up during Add Work or School Account unless an MDM has been configured in Azure AD for auto-enrollment. In this case, a user working on the device won’t authenticate to Azure AD using the Microsoft Passport for Work credential. A future update of Windows will have this support.

On the other hand, the credential in a Windows 10 device (including personal devices), can be used to remotely authenticate to an Azure AD joined or domain joined device. For more information please look for a future post about Microsoft Passport for Work 2Go: using your phone to authenticate to Windows.


Passwords today

There is a problem today with passwords. They are easy to clone and easy to steal. Issues in their implementation make them insecure, and users have a hard time balancing convenience and security. Users typically find “workarounds” to make their life easier when facing security requirements (e.g. a complex password may end up being written in some unsecure location).

Microsoft Passport for Work replaces user passwords with strong device-bound user credentials protected by a user’s gesture (a PIN or a biometric gesture like fingerprint or facial recognition i.e. Windows Hello).

For more details on the problems of passwords please see Problems with traditional credentials section in the Microsoft Passport guide we recently published in TechNet.


The Microsoft Passport for Work credential

The credential is an asymmetric key (private-public key pair) with their private key stored securely in the device in the Trusted Platform Module (TPM), and its corresponding public key securely registered with Azure AD. In the absence of a TPM the keys are software generated and stored encrypted.

The private key does not leave its secure location (if TPM available), it is not known to Azure AD or AD and it never goes into the network. It is only accessible by a gesture that the user knows (a PIN) or the user “is” (bio-gesture) which protects the key cryptographically by encrypting it using a “Hello”. A Hello is an authenticator which is unique to the gesture, the device and the user.

The public key is registered securely with Azure AD after both the device and the user have authenticated. The user must strongly authenticate by providing a second factor of authentication. This is important because the Microsoft Passport for Work credential is considered a strong credential when authenticating to Azure AD. The credential meets multi-factor authentication (MFA) policy and tokens obtained with this credential will have a corresponding related claim.

Once the credential is provisioned, it is used for authentication to Azure AD.


Provisioning the Microsoft Passport for Work credential

All starts with a device becoming registered with Azure AD. A device needs to be Azure AD joined, domain joined (which has auto-registered with Azure AD) or configured with Add Work or School Account before holding a Microsoft Passport for Work credential.

After an Azure AD joined or domain joined device has completed registration, on the next user sign-in to Windows the Microsoft Passport for Work provisioning experience will show up. Registration of the public key with Azure AD happens through the Azure Device Registration Service (Azure DRS).

This experience is a web driven experience rendered in the Cloud eXperience Host (CXH), a special host with access to particular WinRT APIs in the system. This is the same host that is used to render the experience for Azure AD Join.

The experience is launched after the user signs in to Windows if the following conditions are true:

  1. Microsoft Passport for Work policy signals provisioning. This means either of the following conditions:
    • The device is Azure AD joined and Microsoft Passport for Work policy is not disabled (read it: in the absence of the policy being set the default behavior is to provision the credential).
    • The device is domain joined and policy is enabled (read it: in the absence of the policy being set the default behavior is to NOT provision the credential). This is because there is preparation needed in the on-premises infrastructure for a domain joined device to be able to authenticate to a domain controller (DC) using the credential. After the required setup is made, the org. can enable the policy. I’ll mention some considerations about supporting AD on-premises authentication later in the post.
  2. The current session is not a remote session. Note that this doesn’t mean that Microsoft Passport Provisioning for Work won’t happen on virtual machines (VMs), but just that the provisioning experience won’t show up if the user is connected to the VM or physical device via a Remote Desktop Services (RDS) session (which includes connecting to the computer using Hyper-V Enhanced Session Mode, so you know in case you want to try this in your lab on a Hyper-V host).

Once the conditions listed above are met the user will see the provisioning experience. The experience is hosted in the following location:

https://account.live.com/aadngc

The user will see the following page:

Blog - Set up a PIN

Once the user clicks on the ‘Create PIN’ button a WinRT API part of dsreg.dll is called. This registration API performs two operations: 1) authenticates the current user to get a token to Azure DRS, and 2) generates the key pair and registers the public key with Azure DRS using the token obtained in (1).


(1) Authentication of user to Azure DRS

The registration API will first obtain an access token to register with Azure AD the public key that is about to be generated. The token is intended to Azure DRS which registers the public key with the corresponding user and relates it to the corresponding device object. To obtain the token, the API uses the Web Account Manager API:

Windows.Security.Authentication.Web.Core.RequestTokenForWindowAsync

This API invokes the corresponding implementation for the Azure AD plug-in. For more information on the Web Account Manager and its Azure AD plug-in please look for a future post about How SSO works in Windows 10.

Users will see an MFA challenge depending on some conditions:

  1. Users on domain joined devices will see an MFA prompt. This is using username and password credentials. Please note that the November 2015 update of Windows 10 doesn’t support Microsoft Passport for Work provisioning if the user has signed into Windows using a physical or virtual smart-card. We will add this support in a future update of Windows.
  2. Users on Azure AD joined devices will NOT see an MFA prompt if the user joined the device in the first place and provided MFA at the time of join (the attribute ‘RegisteredOwners’ on the device object holds this user). Azure AD will treat the device as a second factor of authentication if the device was registered with MFA for the user who joined it. Please note that this is current service behavior as of the publishing date of this post. We have received mixed feedback about regarding registered devices as MFA. In the future we may allow it under a setting that organizations can control.
  3. Users on Azure AD joined devices who did not join the device will see an MFA prompt.

For a federated organization the MFA challenge can come from Azure AD or from their internal STS (e.g. AD FS):

Blog - MFA during NGC provisioning

After the user authenticates and the API obtains the token, it then proceeds to generate and register the Microsoft Passport for Work keys.


(2) Microsoft Passport for Work keys generation and registration with Azure AD

The registration API relies on the Microsoft Passport crypto API (part of ncrypt.dll) to generate the key and to obtain attestation data if available. Please note that the current implementation of the client and service doesn’t support attestation validation yet. We will enable this functionality in a future update of the service and/or Windows.

The keys are generally not created at this moment but obtained from a pool of keys previously generated. Pre-generation of multiple keys happens upon boot of the device and occurs in the background. Given that these are RSA 2048 bit key pairs, depending on the TPM these may take some time to generate.

After the key pair is obtained, the PIN collection UI shows up and the user is asked for a PIN. A logical container is created and the private key is placed in it:

Blog - NGC PIN collection UI

A container is a logical grouping of key material protected by a protector key which is associated with a gesture. In this case the PIN is associated with a protector key that is obtained at this time. This key securely wraps the Microsoft Passport for Work private key recently obtained. The PIN gesture is the one that can “open” the container and allow access to the key.


About key attestation

As I mentioned above, attestation validation is not yet implemented, however let me provide details on some of the mechanics behind attestation generation. Along with the corresponding public key, its related attestation data, if available, is also obtained using the crypto API. The attestation data consists of the Attestation Identity Key (AIK) certificate and a blob holding information about the user and the Microsoft Passport for Work key generated. The blob is signed by the AIK which is a special purpose RSA key that allows the TPM to offer platform authentication. The AIK in conjunction with the Endorsement Key (EK) and its certificate (from the manufacturer) is sent to Azure Certificate Services to generate the AIK certificate which has a trust that chains up to the TPM manufacturer. This trust chain is what the service will validate upon key registration.


The registration API will now take the Azure DRS access token and the key information and post it to Azure DRS to the following end-point:

POST http://enterpriseregistration.windows.net/EnrollmentService/Key

Azure DRS will find the user object in the directory and add the key information to a particular multi-valued attribute. The key information will contain a reference to the device ID (both user and device IDs are obtained from the token). A user object will have one key for every device where the user has provisioned a Microsoft Passport for Work credential.


About the user’s devices UI in the Azure management portal

One more thing that may be of interest. The UI in the Azure management portal that shows devices for a given user includes devices that the user has registered in a self-service manner (via Azure AD Join or Add Work or School Account). Windows 10 domain joined devices won’t show up given that no user participates in the registration of the device with Azure AD… except, if the user has provisioned a Microsoft Passport for Work credential, the domain joined device will show up in the UI under the user’s devices.


Authentication using the Microsoft Passport for Work credential

Finally after the credential has been provisioned it can be used to authenticate to Azure AD and to AD on-premises upon sign-in to Windows. For details on how this is accomplished please look for a future post on How SSO works in Windows 10.

Authentication to AD on-premises

In terms of the support of Microsoft Passport for Work authentication against AD on-premises, the device needs to be able to reach a DC running Windows Server 2016 (as of the date of this post it is in Technical Preview 4). There is no need to have a new Domain or Forest Functional Level in the on-premises AD.

As an alternative to deploying new DCs, logon certificates using the Microsoft Passport for Work key can be deployed. In this case down-level DCs will use the certificate for authentication (as it is today with virtual smart-cards) and users will enjoy the benefits of Windows Hello. Please note that in this case Azure AD will continue using the key for authentication.

To support logon certificates using the Microsoft Passport for Work key, it is required to have System Center Configuration Manager Technical Preview (domain joined devices) or Intune (Azure AD joined devices) (additional 3rd party MDMs may have this support as well).

For more details on deployment requirements to enable authentication to on-premises AD please see section Deployment requirements in the Microsoft Passport guide in TechNet. Please also refer to related TechNet documentation here for more resources.


Once again, thanks for reading this far and being interested in these features. Please let me know your questions or comments you have.

Until next time,

Jairo Cadena (Twitter: @JairoC_AzureAD)

Posted in Uncategorized | 37 Comments

Azure AD Join: What happens behind the scenes?

In a previous post we discussed about the three ways to setup Windows 10 devices for work with Azure AD. I later covered in detail how Windows 10 domain joined devices are registered in Azure AD. In this post I want to provide some insight about what happens behind the scenes when users join devices to Azure AD (Azure AD Join).

Users can join devices to Azure AD in two ways: 1) through the out-of-box experience (OOBE) the very first time a device is configured (or after a device reset to factory settings) or 2) through Settings after configuring the device with a Microsoft account (e.g. Hotmail) or local account.

In both cases what happens behind the scenes is fundamentally the same:

  1. User chooses to join device to Azure AD.
  2. User authenticates and provides an MFA proof (if configured).
  3. User accepts terms from MDM system (if applicable).
  4. Device registers with Azure AD.
  5. Device enrolls into MDM system and gets sign-in policy (if applicable).
  6. User signs into Windows.
  7. User provisions Microsoft Passport for Work.
  8. Device encryption is enabled and BitLocker key is escrowed to Azure AD.
  9. User enterprise settings are applied.

Let’s take a look at the details of what happens at each phase.


(1) User chooses to join device to Azure AD

When a user turns a device for the first time the user will see the OOBE. Once the user has gone through the initial pages like choosing language/region, accepting legal terms and connecting to the WiFi, the user sees the experience that allows the user to configure the device with a particular account.

The first detail to know is that this experience is web driven and runs under a particular “temporal” user that is created just before the experience shows. This differs from Windows 7/8.1 where all pages are local and run as SYSTEM up to the point of user logon.

Blog - OOBE in Win10 vs down-level

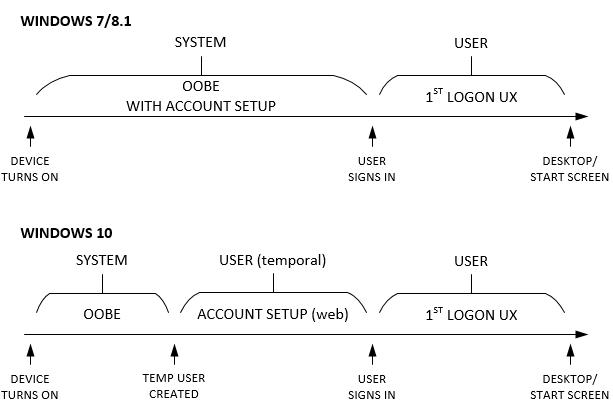
Web pages are rendered in a special host called the Cloud eXperience Host (CXH) which has access to particular WinRT APIs needed for setting up the device.

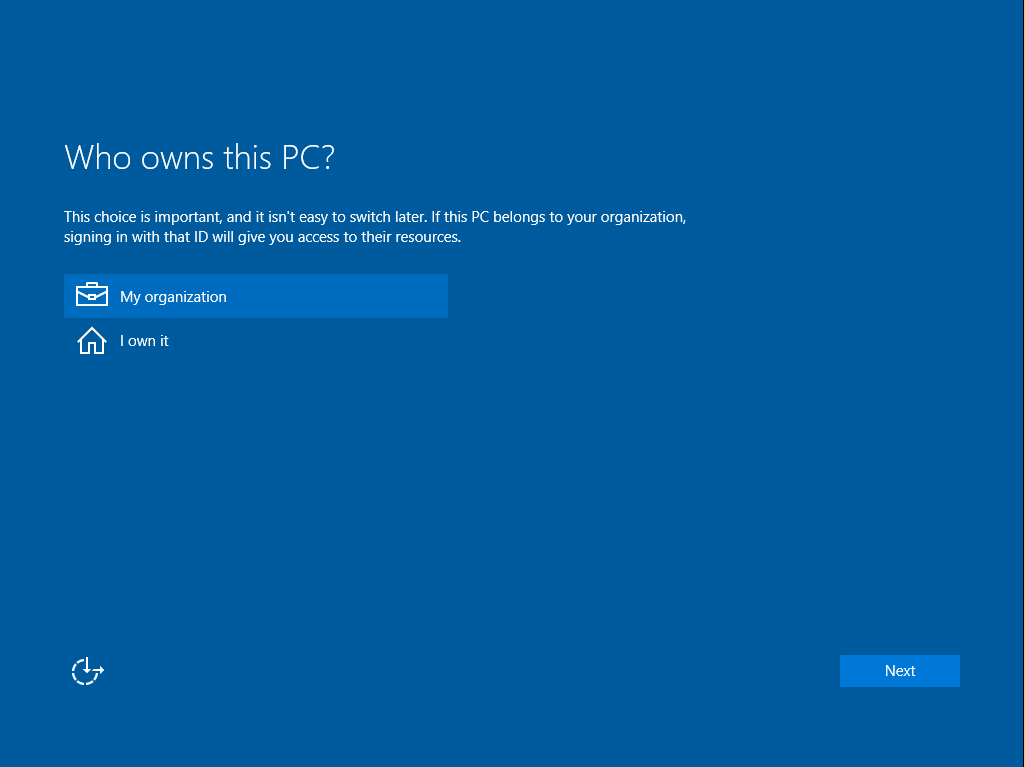
Once the CXH is launched it navigates to a web app that will orchestrate the setup process. If the device runs Windows Professional the user will see a page presenting the option to configure the device as work-owned (using a work account) or personal (using a Microsoft account). If the device runs Windows Enterprise or Windows Home this page won’t show but instead will default to work-owned or personal respectively.

Blog - Ownership page

Once the user has chosen to configure the device as work-owned, the user will have the option to join the device to Azure AD or to create a local account. The current experience shows the option to join the device to a domain (traditional Domain Join) however this option will guide the user to setup a local account for the user to run Domain Join via Settings afterwards.

Blog - Join options page

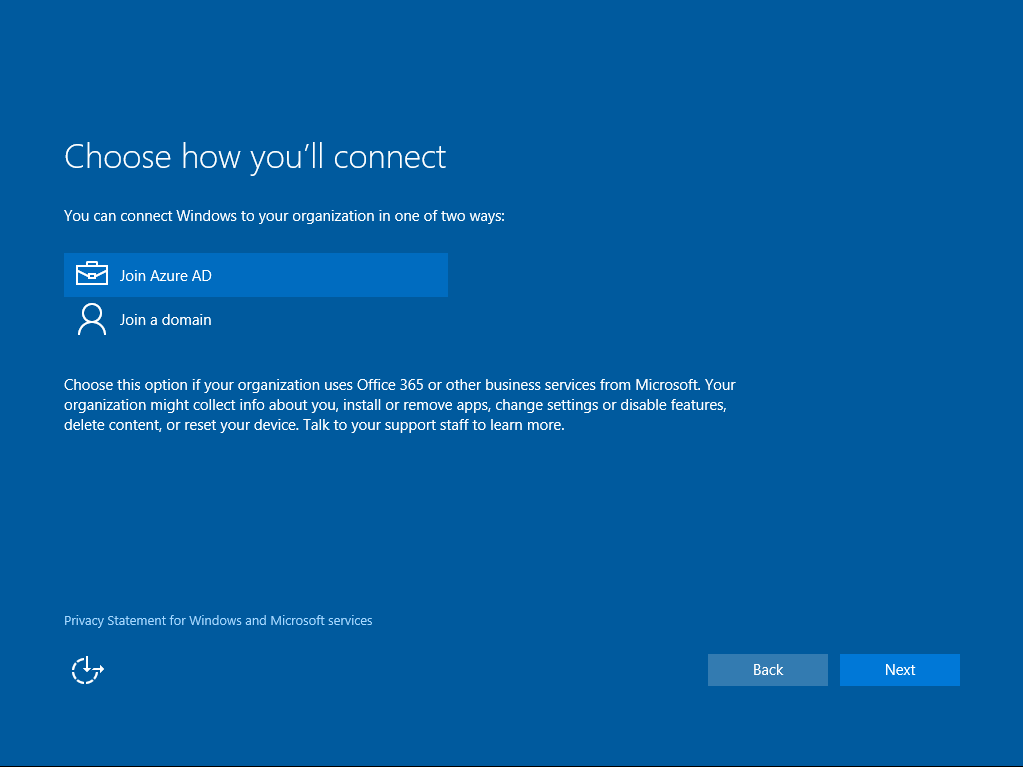
Please note that we are working on improving this experience on a future update of Windows based on feedback we have received from you.

If the user runs Azure AD Join from Settings (after setting up the device as personal or with a local account) the user will see the experience described from this point on.

After choosing Azure AD Join the CXH will navigate to the Azure AD Join web app that is hosted in the following location:

https://login.microsoftonline.com/WebApp/CloudDomainJoin/4

This web app is mainly “client” code in the form of HTML and JavaScript that calls particular WinRT APIs in the system via the CXH.


(2) User authenticates and provides an MFA proof if configured

Now, the web app will reach out to Azure AD to discover auth end-points by retrieving the OpenID configuration:

GET https://login.microsoftonline.com/common/.well-known/openid-configuration

Configuration is retrieved by obtaining the following JSON document:

{
 "authorization_endpoint":"https://login.microsoftonline.com/common/oauth2/authorize",
 "token_endpoint":"https://login.microsoftonline.com/common/oauth2/token",
 "token_endpoint_auth_methods_supported":["client_secret_post","private_key_jwt"],
 "jwks_uri":"https://login.microsoftonline.com/common/discovery/keys",
 "response_modes_supported":["query","fragment","form_post"],
 "subject_types_supported":["pairwise"],
 "id_token_signing_alg_values_supported":["RS256"],
 "http_logout_supported":true,
 "response_types_supported":["code","id_token","code id_token","token id_token","token"],
 "scopes_supported":["openid"],
 "issuer":"https://sts.windows.net/{tenantid}/",
 "claims_supported":["sub","iss","aud","exp","iat","auth_time","acr","amr","nonce","email","given_name","family_name","nickname"],
 "microsoft_multi_refresh_token":true,
 "check_session_iframe":"https://login.microsoftonline.com/common/oauth2/checksession",
 "end_session_endpoint":"https://login.microsoftonline.com/common/oauth2/logout",
 "userinfo_endpoint":"https://login.microsoftonline.com/common/openid/userinfo"
}

The web app will build a sign-in request using the discovered authorization endpoint to obtain a token to Azure DRS:

GET https://login.microsoftonline.com/common/oauth2/authorize
?client_id=01cb2876-7ebd-4aa4-9cc9-d28bd4d359a9
&msafed=0
&nonce=5724294428562708
&prompt=login
&redirect_uri=https%3A%2F%2Flogin.microsoftonline.com%2FWebApp%2FCloudDomainJoin%2F4
&response_type=id_token
&scope=openid+sid
&uxoptin=true
&windows_api_version=2.0

A few things to note:

  1. The value of the parameter client_id corresponds to the one of Azure DRS. This is interesting because the redirect URI is not the Azure DRS end-point but the Azure AD Join web app. In this special case the Azure AD Join web app is considered a client of Azure DRS.
  2. The token requested is an ID token. This is because the Azure AD Join web app needs to get claims from the token that need to pass to APIs for discovery, registration and MDM enrollment. Remember that the Azure AD Join web app is considered a client of Azure DRS.
  3. There is a parameter particular to Windows to specify the API version. The value of 2.0 allows obtaining MDM related URLs (for later use) as claims in the ID token.

The user will see the sign-in page where to enter credentials:

Blog - Sign-in page AADJ - 1

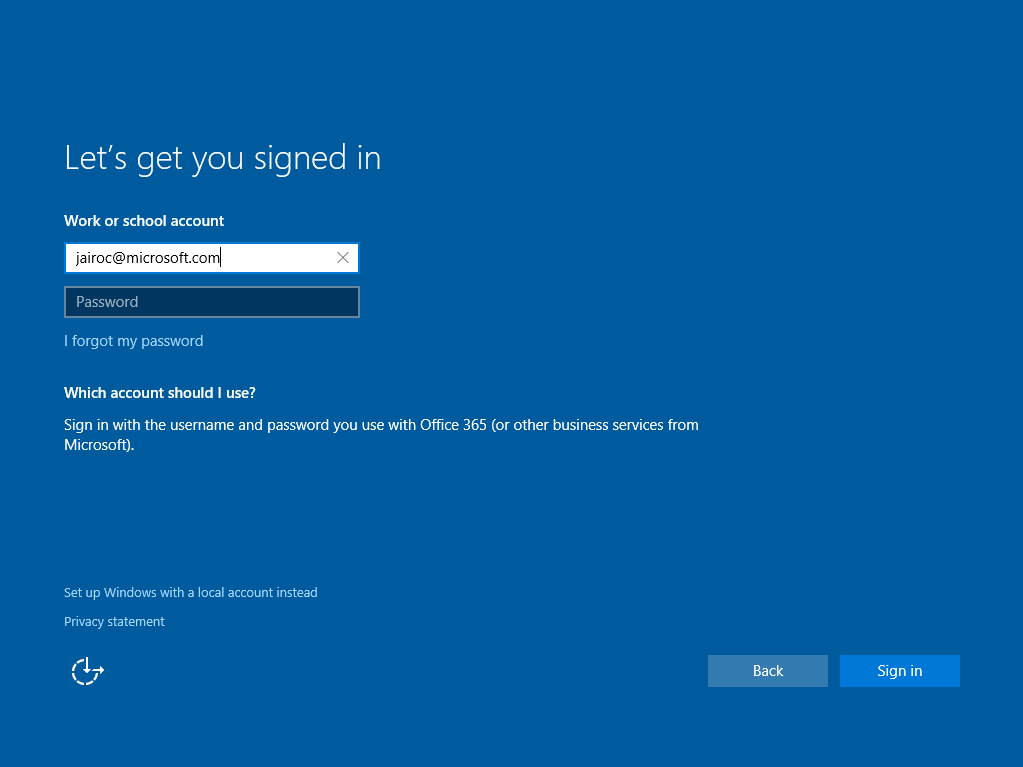
Once the user types the username the page will discover the corresponding realm information. This will determine whether the user needs to be redirected to a different STS (Secure Token Service) like an AD FS on-premises. This is done by retrieving realm information about the user’s domain name:

GET https://login.microsoftonline.com/common/userrealm/
?user=jairoc@microsoft.com
&api-version=2.1

The following is an example of a JSON object for the realm information for a federated tenant:

{
 "IsDomainVerified":0,
 "NameSpaceType":"Federated",
 "federation_protocol":"WSTrust",
 "Login":"jairoc@microsoft.com",
 "AuthURL":"https://msft.sts.microsoft.com/adfs/ls/?username=jairoc%40microsoft.com&wa=wsignin1.0&wtrealm=urn%3afederation%3aMicrosoftOnline&wctx=",
 "DomainName":"microsoft.com",
 "FederationBrandName":"Microsoft"
}

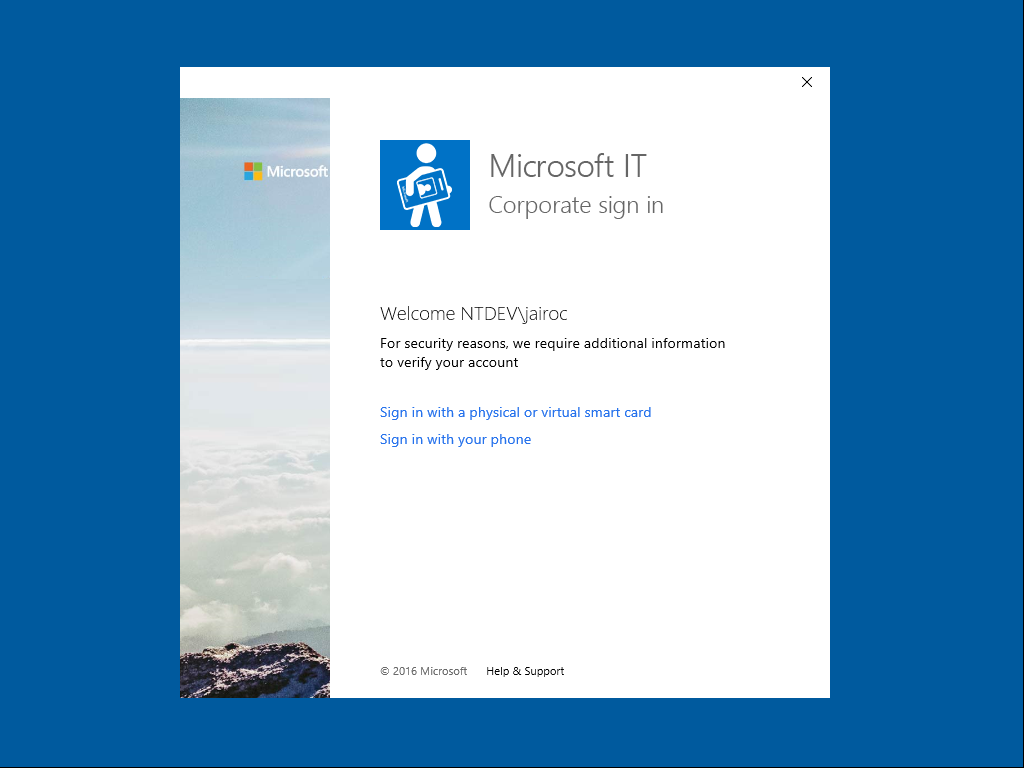
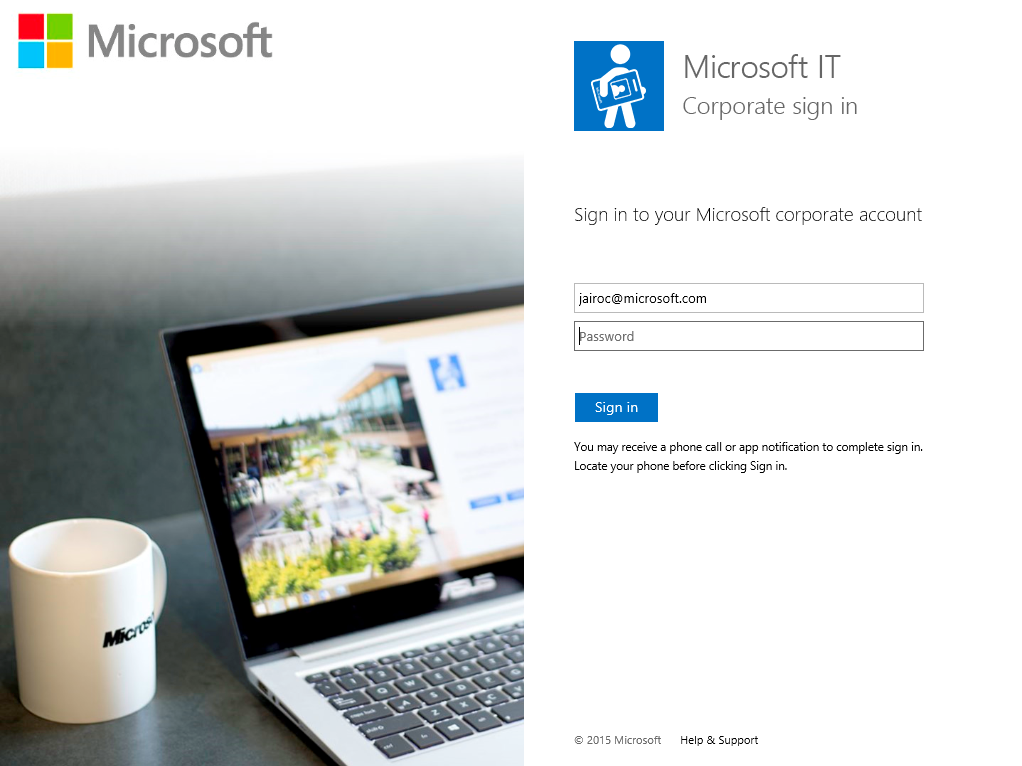
If the tenant is federated the user will see the on-premises STS sign-in page where user can enter credentials . If the tenant is managed the user will be able to enter the password directly in the same page. In either case, if MFA has been configured the user will be challenged for additional factors of auth before proceeding.

Blog - Sign-in page AD FS - 1

For managed tenants only, an authentication buffer is created locally and temporary cached for automatic sign-in of the user to Windows at the end of OOBE (this doesn’t happen if run from Settings which will require a sign-out and a manual sign-in by the user). Federated tenant users will need to authenticate to the Windows logon UI after OOBE has completed.

Credentials are posted to Azure AD for authentication to the login end-point along with a few parameters indicating that this is a CXH driven authentication. This is useful to tweak some behaviors on the service side:

https://login.microsoftonline.com/common/login
 ?cxhflow=MOSET
 &cxhver=1.0
 &cxhplatform=Desktop

Note that it indicates where the join is run from (Settings or OOBE), the version of the host (to accommodate for future behaviors) and the platform (Desktop or Mobile).

After authentication succeeds, an ID token is generated and posted back to the Azure AD Join web app. The following is an example of the contents of the token:

{
 upn : "jairoc@microsoft.com"
 instance : "NA"
 amr : ["pwd","mfa"]
 tid : "df5be8b1-f322-456c-acff-b13066d72402"
 sid : "S-1-12-1-1875800440-1278975369-1393086615-305892544"
 nbf : 1453828246
 ver : "1.0"
 mdm_enrollment_url : "https://manage-beta.microsoft.com/EnrollmentServer/Discovery.svc"
 family_name : "Cadena"
 sub : "4ySzMn-D18vwlmB4lWNipSg7Y5-qDVg9g41XVyoRvF4"
 user_setting_sync_url : "Discovery:https://kailani.one.microsoft.com"
 onprem_sid : "S-1-5-21-1515794938-1370939529-2107639213-1112"
 oid : "6fce7178-9d89-4c3b-97d0-0853c08c3b12"
 exp : 1453832146
 given_name : "Jairo"
 iat : 1453828246
 iss : "https://sts.windows.net/df5be8b1-f322-456c-acff-b13066d72402/"
 aud : "dd762716-544d-4aeb-a526-687b73838a22"
 name : "Jairo Cadena"
 unique_name : "jairoc@microsoft.com"
 tenant_display_name : "Microsoft"
 primary_sid : "S-1-5-21-1515794938-1370939529-2107639213-1112"
}

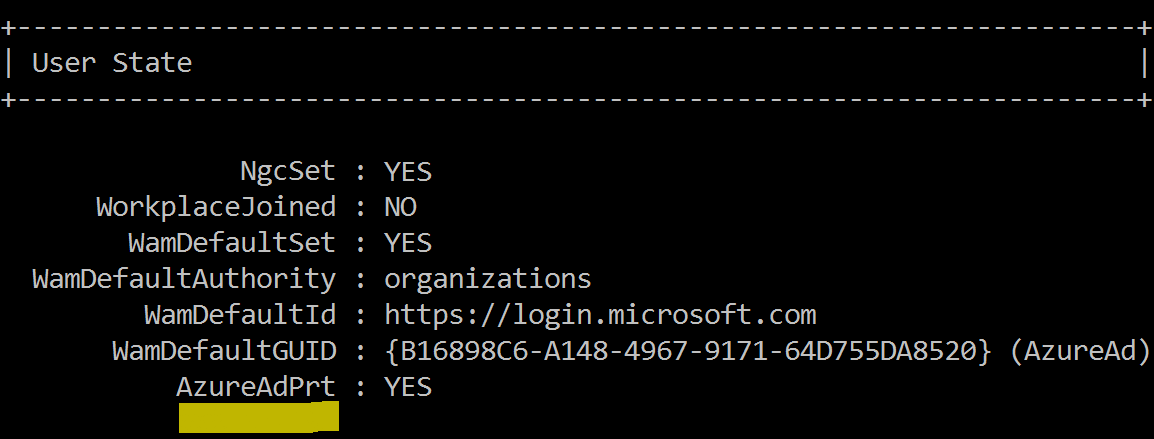
Please note that this information is cached locally in the device and is accessible after device registration completes through the following APIs in dsreg.dll:

DsrGetJoinInfo
or
DsrGetJoinInfoEx

The following claims in particular contain URLs which are used later on to complete configuration of the device.

mdm_tou_url
mdm_enrollment_url
user_setting_sync_url

To know how, please keep reading :).


(3) User accepts terms from MDM (if applicable)

The next step is for the user to accept the terms from the MDM. If there is a corresponding URL configured in Azure AD for the MDM app for this user, the ID token will contain a claim mdm_tou_url. For more information about how these URLs are setup see the post in the Active Directory blog about Windows 10 Azure AD and Microsoft Intune MDM enrollment.

If present the web app will navigate to the URL and the user will be presented with the terms of acceptance.

Upon acceptance the page posts back an acceptance buffer that the web app will use later when calling the MDM enrollment API.


(4) Device registers with Azure AD

Via JavaScript the web app calls a WinRT worker API that in turn calls APIs for discovery of the registration service, device registration and MDM enrollment:

CloudDomainJoin.DataModel.CloudDomainJoinWorker

This API first calls a “discovery” API to obtain information about the registration service (i.e. Azure DRS). This API is an internal Win32 API implemented in dsreg.dll which retrieves the discovery data document from:

https://enterpriseregistration.windows.net/microsoft.com/enrollmentserver/contract?api-version=1.2

This document contains information about Azure DRS registration and authentication end-points including the federation STS end-point (if configuration is federated), the Azure DRS URI, the end-point for Microsoft Passport provisioning, etc. One example of this document is shown below:

https://enterpriseregistration.windows.net/EnrollmentServer/DeviceEnrollmentWebService.svc
urn:ms-drs:enterpriseregistration.windows.net1.0
https://login.microsoftonline.com/microsoft.com/oauth2/authorize
https://login.microsoftonline.com/microsoft.com/oauth2/token
https://msft.sts.microsoft.com/adfs/ls/
https://enterpriseregistration.windows.net/EnrollmentServer/device/
urn:ms-drs:enterpriseregistration.windows.net1.0
https://msft.sts.microsoft.com/
https://device.login.microsoftonline.com/
https://enterpriseregistration.windows.net/
https://enterpriseregistration.windows.net/EnrollmentServer/key/
urn:ms-drs:enterpriseregistration.windows.net1.0

Please note that some of these URLs/URIs are added to the cache data accessible by the DsrGetJoinInfoEx API after device registration completes (not the DsrGetJoinInfo).

With the discovery data and the ID token obtained during authentication the worker API then calls another API to perform device registration. This is another internal Win32 API in dsreg.dll which does the following:

  1. Generates a key pair for the device certificate.
  2. Generates a certificate signing request (CSR) using the key pair above (signs CSR data with private key plus includes public key in request).
  3. Generates a second key pair that will be used to bind SSO tokens physically to the device when authenticating to Azure AD later on. This key is typically called the storage/transport key (Kstk) and is derived from the SRK (Storage Root Key) of the device TPM. The way the binding of the SSO token to the device is achieved is by storing into the TPM a corresponding symmetric session key (encrypted to the storage/transport key) issued along with the SSO token upon auth to Azure AD. Along with the key pair, obtains attestation data in the form of a blob. For more details about how this please look for a couple of future posts where I will talk about SSO in Windows 10 devices and Internals of Microsoft Passport for Work.
  4. Sends a device registration request to Azure DRS (to end-point obtained from discovery document) passing along the ID token, the generated CSR and the public portion of the storage/transport key along with its attestation data.

Once the request comes to Azure DRS, the service will validate the token, will create a corresponding device object in Azure AD and will generate and send back a certificate to the device. The API in turn will install the certificate into the LocalMachine\MY store.

Using Windows PowerShell you can easily spot this certificate checking for the CN=MS-Organization-Access particular issuer:

PS C:\> dir Cert:\LocalMachine\My\ | where { $_.Issuer -match "CN=MS-Organization-Access" } | fl


Subject      : CN=fbfcc7db-3b31-4818-aaf0-15aeb1ab1875
Issuer       : DC=net + DC=windows + CN=MS-Organization-Access + OU=82dbaca4-3e81-46ca-9c73-0950c1eaca97
Thumbprint   : A948413B32FA0A6435275693D4136BE10DFB4E97
FriendlyName :
NotBefore    : 1/30/2016 10:27:39 AM
NotAfter     : 1/27/2026 10:57:39 AM
Extensions   : {System.Security.Cryptography.Oid, System.Security.Cryptography.Oid, System.Security.Cryptography.Oid,
               System.Security.Cryptography.Oid...}

Also using MSOL Devices cmdlets you can query the device object in Azure AD:

PS C:\> Get-MsolDevice -DeviceId fbfcc7db-3b31-4818-aaf0-15aeb1ab1875
Enabled                       : True
ObjectId                      : 3772980f-8553-402f-b092-7bd35395a6bd
DeviceId                      : fbfcc7db-3b31-4818-aaf0-15aeb1ab1875
DisplayName                   : DESKTOP-51PBLPR
DeviceObjectVersion           : 2
DeviceOsType                  : Windows
DeviceOsVersion               : Windows 10
DeviceTrustType               : Azure AD Joined
DeviceTrustLevel              : Compliant
DevicePhysicalIds             : {}
ApproximateLastLogonTimestamp : 1/30/2016 6:57:39 PM
AlternativeSecurityIds        : {X509:<SHA1-TP-PUBKEY>A948413B32FA0A6435275693D4136BE10DFB4E97aOQeN/3X9Ak0C6mIWQSOeM17t
                                wLhlA2UXOYTHLJutFw=}
DirSyncEnabled                :
LastDirSyncTime               :
RegisteredOwners              : {jairoc@ntdev.microsoft.com}
GraphDeviceObject             : Microsoft.Azure.ActiveDirectory.GraphClient.Device

A few things to highlight:

  1. DeviceId is a GUID generated by Azure DRS. Note that this is the same value in the Subject field of the certificate.
  2. AlternativeSecurityIds contains the certificate thumbprint with a specific scheme format (i.e. “X509:<SHA1-TP-PUBKEY>:” + thumbprint). This is how Azure AD will find the device object when the device presents the certificate upon authentication.
  3. The storage/transport key is stored in the device object in an attribute non-visible through Graph API.


(5) Device enrolls into MDM system and gets policy

Upon successful registration the worker API calls the MDM enrollment API passing along the following:

  1. An access token to the MDM enrollment service (MDM application in Azure AD).
  2. The acceptance of terms blob obtained from the corresponding MDM page (if present).

To obtain the MDM access token it first obtains an auth code by authenticating to the MDM enrollment service application silently relying on SSO cookies obtained previously during authentication to Azure DRS:

GET https://login.microsoftonline.com/common/oauth2/authorize
?client_id=29d9ed98-a469-4536-ade2-f981bc1d605e
&msafed=0
&nonce=7912667160858957
&redirect_uri=https%3A%2F%2Flogin.microsoftonline.com%2FWebApp%2FCloudDomainJoin%2F4
&response_type=code
&resource=https://manage-beta.microsoft.com/

A few things to note:

  1. Client ID corresponds to the one of the MDM app in Azure AD.
  2. The response type requested is a code.
  3. The resource is the value for the mdm_enrollment_url claim in the ID token.

The worker API will then use the code to obtain an access token for enrollment to happen. It does so by posting the code to the token end-point:

POST https://login.microsoftonline.com/common/oauth2/token
grant_type=authorization_code
&code=AAABAAAAiL9Kn2Z27UubvWFPbm0gLViFwdiaP_FoKfldoPoZ6-o_aBfB1H8nQJgkWzbD1W1J8F3hCrO7aTO69QAib-PfvEFZTC3BwK53vNfuZ576-HunV5qGup1Pbf5N8p3Dv-HcZ
tMIUpgvmqwTCJ1mS4e4M-0cPaCejrV4imOrVOocm92F9TS5ME-d44PQ2aQVXqLSKfGsvUEnbnzN1InYTmkk_sHaxZOiAYPofFR4AeuM5EmaNCK3e5lQVqHaBIXmGJnRRpKxOqQAAPxXtPrh
5089NjNhEOgdkywyqCOSmV7FEejcSycZmpPHuvzxuUq85V_g0XS2a0y6OSgoh8lqSIBVXerds7etsC6USg4HMnCKxmZHrhxTjAp0citwUoGV3Ch6uOOgVpOKt7D4AZIfTYVEhz9p-7371EG
ZaIkC6jKdfg3SwxJj4gfC_WfeJc6NGCJE2iWcIQpFmywHEBAnNrQv_2ZmyTq3TEnycijLpK8IUU5ZwtqAqAFoi7qRKb0R6GlRSnqCS9WKQaRbGkzF17IENorhD01MYwWCOrtcMW4oKfy7Qw
Ehn5oPEIoaoQzLsbwjL5Wor90sbmltHCXN5KECSkMnMaa5Yz0YPsdh4ULaOZDwXrJrJxau4_DCxHss_0ENu2mjfH3tumTjG-s3A-qoHiUHjxUXbls_BdQ0X8SVLjECz1mLVsOe_rNc_bsUl
PTdAzLSyQkeRTWFYb19X3CwPCAA
&client_id=29d9ed98-a469-4536-ade2-f981bc1d605e
&redirect_uri=https%3A%2F%2Flogin.microsoftonline.com%2FWebApp%2FCloudDomainJoin%2F4
&resource=https://manage-beta.microsoft.com/

The worker API will get back a bearer token with an access token, an ID token and a refresh token. It extracts the access token and passes it to the MDM API.

MDM enrollment occurs and sign-in policy is obtained as part of the payload coming from enrollment.


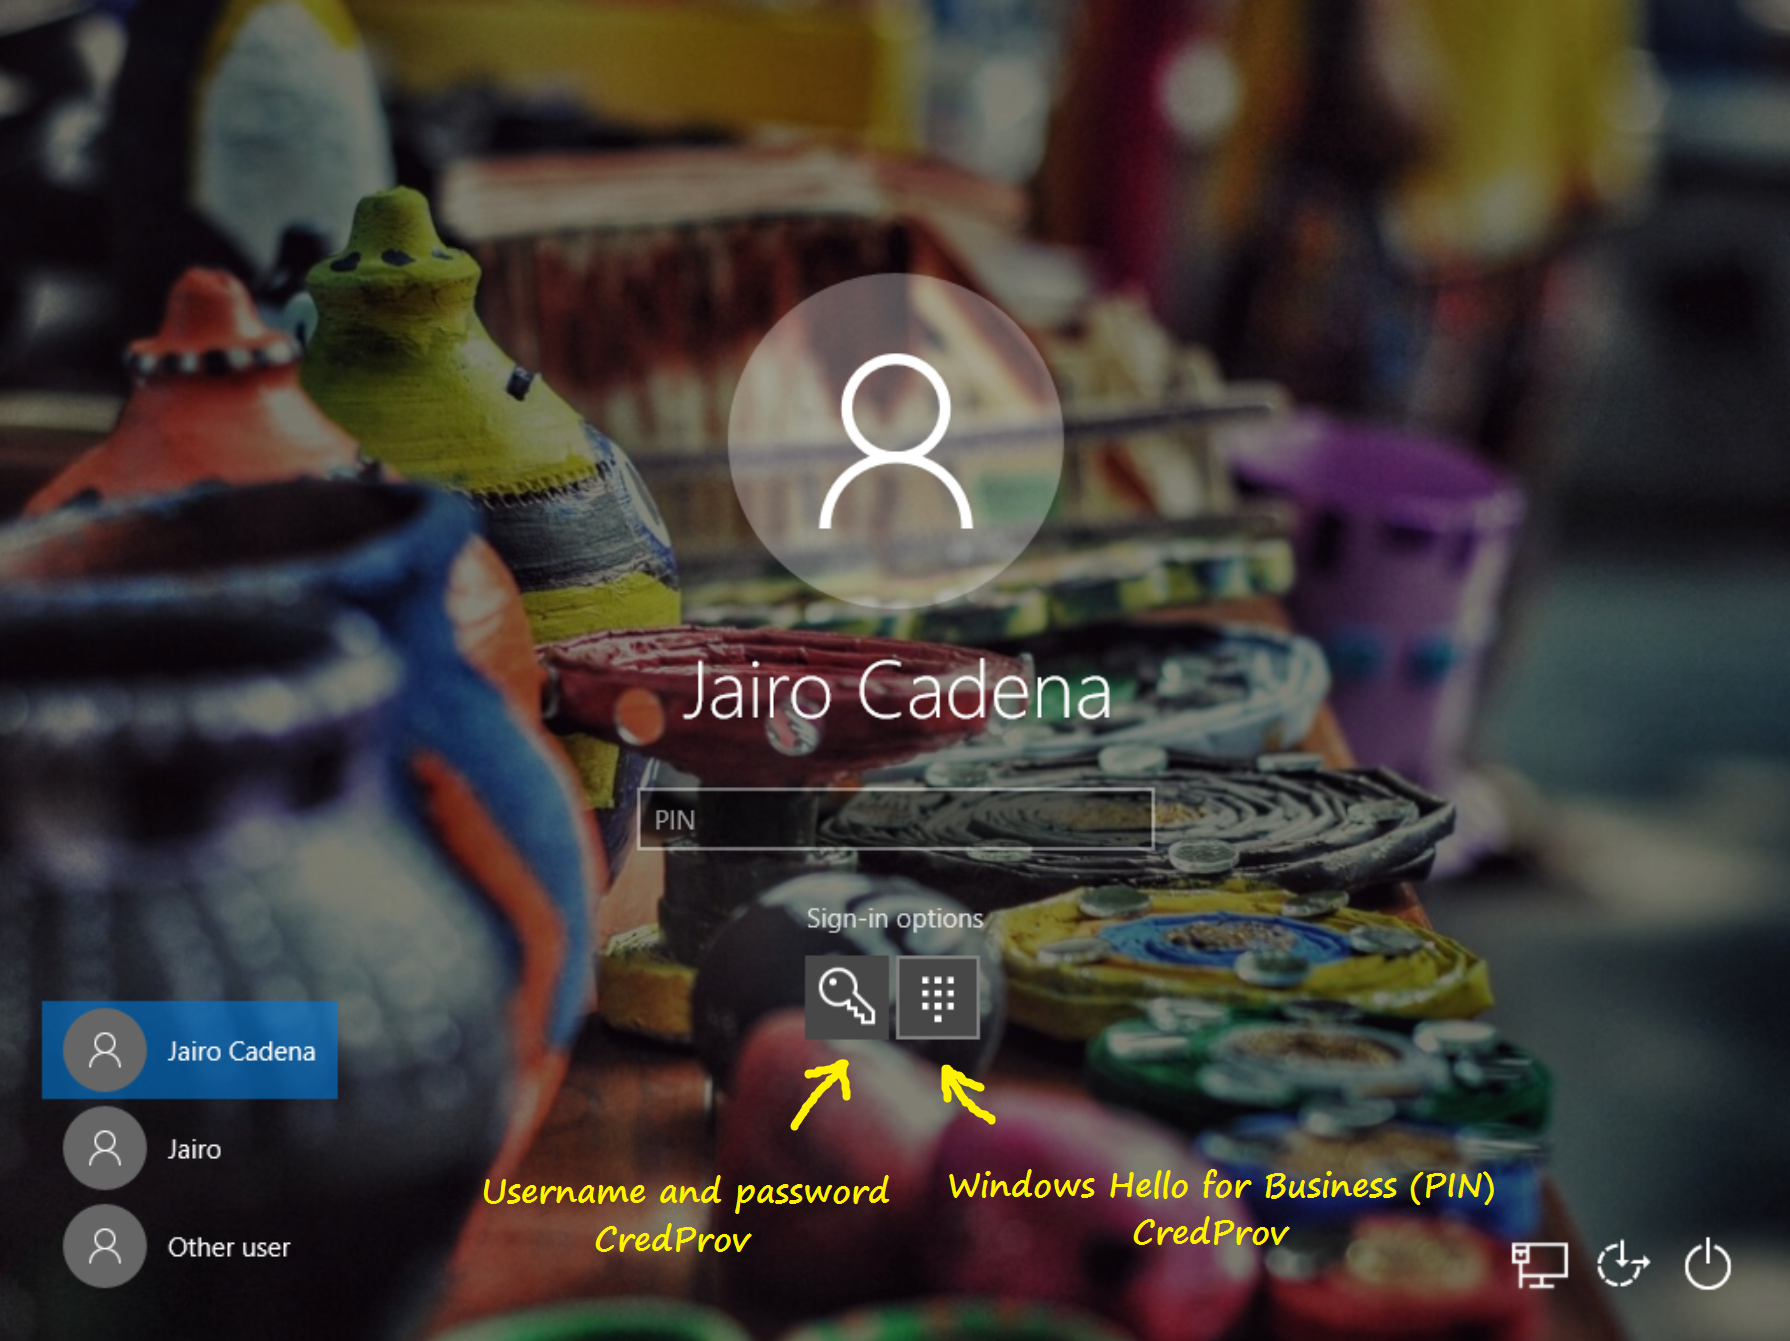
(6) User signs into Windows

Once MDM enrollment completes it is time for the user to sign in. The user is automatically signed in if the tenant is managed (i.e. no federation with an on-premises STS). This is accomplished by taking the authentication buffer obtained during authentication to Azure DRS (step #2 above) and passing it to the LSA to the Cloud Authentication Provider which in turn authenticates both the user and the device with Azure AD. For more information about how this works in detail look for a future post on SSO in Windows 10 devices.

Please note that for a future update of Windows we have plans to extend the user’s automatic sign-in behavior to federated tenants as well.


(7) User provisions Microsoft Passport for Work

User provisions Microsoft Passport for Work for a secure and convenient sign-in to Windows using Windows Hello, a user’s gesture that includes a PIN, finger-print, iris or facial recognition.

I won’t delve into this today as this subject deserves a full post. Please look for a future post about Internals of Microsoft Passport for Work for complete details on what happens behind the scenes.


(8) Device encryption is enabled and BitLocker key is escrowed to Azure AD

If the device is InstantGo capable (always on, always connected, like the Surface or Surface Pro), device disk encryption is enabled and the key is sent to Azure AD to be registered in the corresponding device object.

This is done by the BitLocker Drive Encryption Service (BDESVC) which uses the following end-point discoverable through the DsrGetJoinInfoEx API to write the key in Azure AD:

 POST https://enterpriseregistration.windows.net/EnrollmentService/Key

The way the service authenticates the device to the end-point is by relying on the SSO capabilities of Windows 10. For more information about this please look for a future post about SSO in Windows 10 devices.


(9) User enterprise settings are applied.

One last point to mention the Enterprise Roaming of Settings capability. As of the date of this post it is a capability that is still on Private Preview (soon will be available for Public Preview). This component will authenticate to the Enterprise Roaming of Settings service using the SSO capabilities of Windows 10.

Once authenticated settings are retrieved and applied to the local device. It will rely on information returned by DsrGetJoinInfo to reach out to the service (i.e. user_setting_sync_url claim of ID token initially obtained, accessible through the DsrGetJoinInfo API).


Final thoughts

I hope this detail gives you a good idea about how Azure AD Join works. Please also let me know what you would like to see posted in future entries.

Again thanks for reading this far :).

See you soon,

Jairo (Twitter: JairoC_AzureAD)

Posted in Uncategorized | 71 Comments

How Domain Join is different in Windows 10 with Azure AD

In the previous post I talked about the three ways to set up devices for work with Azure AD. In this post I will talk about Domain Join and how additional capabilities are enabled in Windows 10 when Azure AD is present.

Domain Join until now

Domain Join has been deployed by many of you since the beginning of this millennium (although Domain Join existed even before AD was born and Windows NT was around).

Domain Join adds a computer to a particular realm, the Active Directory domain. The computer gets a unique identity and a channel is created so admins can reach out to the computer for settings and policy purposes (a.k.a. Group Policy).

When the computer is physically in the domain network it authenticates to the domain through a domain controller (DC). The computer participates in authorization decisions when accessing other resources in the domain. Users who sign-in to these computers using their AD accounts get authenticated to the domain as well.

Domain Join in Windows 10 and Azure AD

None of the existing behaviors for Domain Join change in Windows 10, however new capabilities light up when Azure AD is in the picture:

  1. Users don’t see additional authentication prompts when accessing work resources (a.k.a. SSO). Users enjoy SSO to Azure AD apps even when not connected to the domain network.
  2. Enterprise compliant roaming of user settings across joined devices. Users don’t need to connect a Microsoft account (e.g. Hotmail) to see settings across devices.
  3. Access to Windows Store for Business using AD account. Users can choose from an inventory of applications pre-selected by the organization.
  4. Microsoft Passport for Work and Windows Hello for secure and convenient access to work resources.
  5. Restriction of access to apps from only devices that meet compliance policy.

Domain joined devices will automatically register to Azure AD and avail of the above mentioned experiences. You can enable this functionality in your organization quite easily through a particular Group Policy. Note that you need to have the latest version of Azure AD Connect (AAD Connect). Look for a future post where I’ll discuss the AAD Connect role in enabling Windows 10 experiences.

To understand how this process works let’s consider the following illustration:

Blog - Windows 10 and Domain Join Registration


(1) Policy signals device to start auto-registration with Azure AD

When the policy Register domain computers as devices is pushed down to the computer via Group Policy the device registration process will trigger. This policy is found at:

Computer Configuration/Policies/Administrative Templates/Windows Components/Device Registration

Please notice that if you are using the Group Policy management console from Windows Server 2012 R2 the policy name is Automatically workplace join client computers and is found at:

Computer Configuration/Policies/Administrative Templates/Windows Components/Workplace Join

The registry key value for this policy in the device is the REG_DWORD value autoWorkplaceJoin under:

HKEY_LOCAL_MACHINE\SOFTWARE\Policies\Microsoft\Windows\WorkplaceJoin

A task registered in Task Scheduler with name Automatic-Device-Join under \Microsoft\Windows\Workplace Join triggers once the registry key value for the policy changes. A value of 1 means that auto-registration is enabled.

(2) Device queries Active Directory to get information about Azure AD tenant

The task which runs as SYSTEM reaches out to AD using the computer identity to query Azure AD tenant information stored in a Service Connection Point (SCP) object in the configuration naming context of the forest where the computer domain belongs.

The SCP is created by AAD Connect during Express installation. AAD Connect provides a PowerShell cmdlet to create the object manually. Please see more details at step-by-step to register Windows 10 domain joined devices to Azure AD. This SCP is placed in the following location (for example for the contoso.com domain):

CN=62a0ff2e-97b9-4513-943f-0d221bd30080,CN=Device Registration Configuration,CN=Services,CN=Configuration,DC=contoso,DC=com

The keywords multi-valued attribute on this object contains two values, one for the tenant domain name and one for the tenant ID. For example:

azureADName:contoso.com; azureADId:6c8b4242-a724-440d-a64c-29373788285b

(3) Device authenticates itself to Azure AD via AD FS to get a token for registration

Once it gets this information, it authenticates to Azure DRS via AD FS using Windows Integrated Authentication (i.e. Kerberos auth using the computer identity). AD FS issues a token to Azure AD before Azure AD issues the final token for Azure DRS. Three claims are passed to Azure AD via the AD FS token when the computer authenticates, and are written as attributes in the newly created device object:

  1. Object GUID of computer object on-prem.
  2. SID (Security Identifier) of computer object on-prem.
  3. Claim stating that computer is domain joined.

These claims are generated thanks to three AD FS issuance transform rules that are created by AAD Connect during Express installation. To know how to create these rules manually please see more details at step-by-step to register Windows 10 domain joined devices to Azure AD.

AAD Connect will then later use these attributes in the device object to correlate it with the computer object in on-prem AD. This is needed for lifecycle of the device object which is authoritative on-prem. For more details please look for a future post where I’ll discuss the AAD Connect role in enabling Windows 10 experiences.

(3b) Device authenticates itself to Azure AD (when Azure AD SSO configuration is password hash sync’ i.e. no AD FS)

When Azure AD SSO configuration is not federated but password hashes are sync’ed from on-prem, the following happens for the device to authenticate to Azure DRS:

  1. The task will create a credential in the form of a self-signed certificate and will register with the computer via LDAP in the userCertificates attribute.
  2. AAD Connect detects that the computer has registered this credential and takes it up to Azure AD in the form of a device object holding this credential, the object GUID and the computer SID.
  3. The task will use the credential in #1 to authenticate to Azure DRS directly once the device is created in #2.

Please notice that there is a inherent delay between the time the policy reaches the device and the device is ready for registration. This is because the credential that is used to complete device registration against Azure AD must flow up through AAD Connect in the absence of federation. For more details please look for a future post where I’ll discuss the AAD Connect role in enabling Windows 10 experiences.

(4) Device generates keys used in device registration

The task generates a private/public key pair to be used in a certificate signing request (CSR) to Azure DRS to obtain the certificate that the device will use to authenticate to Azure AD later on.

In addition, the task generates a second private/public key pair that is later used to bind the Primary Refresh Token (PRT) to the physical device upon authentication. This removes the risk of token replay in other devices. The PRT is the token used to provide SSO when users in that device access Azure AD applications. Please look for a future post about SSO in Windows 10 devices to understand in detail how this works.

If AD FS vNext is deployed (i.e. AD FS in Windows Server 2016 which is in Production Preview as of the date of this post), the device will also obtain an AD FS PRT for SSO to AD FS applications. Please look for a future post that I will publish about AD FS support for Windows 10.

If the device has a Trusted Platform Module (TPM) the private keys will be hardware protected.

(5) Device registers with Azure AD via Azure DRS

The task sends the CSR obtaining the certificate which places in the LocalMachine\My store. A device object is created in Azure AD and the certificate thumbprint is associated with it.

In addition the public key for PRT binding is registered with the device object as well. To learn how this key is used during authentication to protect the PRT look for a future post where I’ll cover the topic of SSO in Windows 10 devices.


Final thoughts

Once registration is complete users will enjoy the new experiences described at the beginning of this post. IT will also be able to restrict access to only devices that are domain joined or only domain joined devices that are compliant. Please also look for a future post that I will publish about device conditional access and Windows devices.

Until next time,

Jairo (Twitter: @JairoC_AzureAD)

Posted in AD FS, Azure AD Connect, Azure AD Join, Device Conditional Access, Device Registration, Domain Join, Microsoft Passport for Work, On-premises Active Directory | 186 Comments

Setting up Windows 10 devices for work: Domain Join, Azure AD Join and Add Work or School Account

To enable secure access to apps and services, an organization may constrain access to only devices that are properly configured for work. When a device is setup for work, users can access securely and under compliance, apps, services and data using their work accounts (i.e. AD or Azure AD accounts).

Windows 10 offers three ways to setup a device for work: Domain Join, Azure AD Join and through Add Work or School Account for personal devices. In all cases, devices obtain an identity with Azure AD (a.k.a. register with Azure AD) and come under the control of the organization (i.e. devices are managed by the org.).

Using their work accounts on these devices, users will:

  1. Experience Single Sign-On (SSO) to Office 365 and SaaS apps from everywhere.
  2. Enjoy roaming of OS settings across joined devices.
  3. Be able to access the Windows Store for Business.
  4. Have the convenience of Microsoft Passport & Windows Hello to access work.

On the other hand, organizations will:

  1. Be able to restrict access to only devices meeting Conditional Access policy.
  2. Have piece of mind as settings and work data roam through enterprise compliant clouds. No Microsoft accounts are involved (e.g. Hotmail), and can be blocked.
  3. Reduce the risk of credential theft by implementing Microsoft Passport for Work.


Domain Join

This is the traditional way organizations have deployed Windows work devices for years. Devices are typically managed with Group Policy or System Center Configuration Manager (SCCM).

Windows 10 domain joined devices automatically register with Azure AD enabling new experiences to both users and admins. The process to join devices to the domain doesn’t need to change. Upon reboot the device attempts registration with Azure AD using its on-prem AD computer account identity. Expect a blog entry where I will describe in detail how this process works.


Azure AD Join

This is a new way for setting up work devices for work. Devices register directly with Azure AD. It provides a self-service experience for the user to setup the device from anywhere (in contrast with Domain Join which is typically done as part of an imaging process or by an admin). In a future update of Windows, Azure AD Join will offer a pre-provisioning experience for admins to prepare devices before handing them out to users.

As part of the device setup experience the device also automatically enrolls into Intune or the MDM system that has been configured in Azure AD.


Add Work or School Account

This is the way to enable personal devices to access work resources. It can be done via Settings (Accounts -> Your Account) or when the user configures an app for work. For example a user can choose to add the work account to Windows at the moment is setting up the Mail app to connect to Office 365. The user will enjoy SSO to work resources through apps and browser (Edge and IE).

In addition, adding the work account will enroll the device with Intune or the MDM system that has been configured in Azure AD.

Please note that Add Work or School Account is the replacement for the Workplace Join experience in Windows 8/8.1.

Please also note that both Domain Join and Azure AD Join allow users to sign-in/unlock devices using their work accounts. Personal devices are unlocked using Microsoft accounts (i.e. Hotmail, Live, Outlook, Xbox, etc.). Add Work or School Account doesn’t change this fact, but adds the work account on top of it (a.k.a. as a secondary account). The Microsoft account is still used for unlocking the device or for driving default Windows experiences like roaming of OS settings or Cortana.


That’s it for now. Please expect subsequent posts that describe in detail some of these concepts. See you soon!

Jairo (Twitter: @JairoC_AzureAD)

Posted in Azure AD Join, Device Conditional Access, Device Registration, Domain Join, Microsoft Passport for Work, On-premises Active Directory | 24 Comments

Hello Identity world!

Welcome to this space where I will be sharing scenarios and features related to Active Directory (AD) and Azure Active Directory (Azure AD). I will touch on areas I own or contribute as part of my Program Management role in the Identity Services Division at Microsoft.

I would love to use this blog as a two way channel where I can hear from you, customers, partners and the broader community, and in so doing, bring feedback directly to the product as we develop new experiences and features.

I will start with areas related to scenarios customers are asking for as I hear in my conversations with you, that I see would be beneficial to address in a broad approach. This includes topics around AD in Windows 10, Microsoft Passport for Work (hint: no passwords), Device Conditional Access, among others, for both the hybrid and on-premises only enterprise.

On a contextual note, I have been with the Active Directory team in both engineering and program management roles since 2005. The following Ignite/TechEd sessions show areas that I have worked on in the past:

AD in Windows 10 @ Ignite 2015: https://channel9.msdn.com/Events/Ignite/2015/BRK3332

Web Application Proxy (AD FS Proxy) @ TechEd North America 2013: https://channel9.msdn.com/Events/TechEd/NorthAmerica/2013/WCA-B333

Active Directory “tricks-of-the-trade” over a decade @ TechEd North America 2011: https://channel9.msdn.com/Events/TechEd/NorthAmerica/2011/WSV401

One more thing. I have opened a Twitter account to talk about this subject in particular. I’ll post notifications of posts to this blog there. It can also be a great way to start new conversations.

Thank you for reading this far. Let’s start this journey!

Jairo (Twitter: @JairoC_AzureAD)

Posted in AD FS, Azure AD Connect, Azure AD Join, Device Conditional Access, Device Registration, Domain Join, Microsoft Passport for Work, On-premises Active Directory | 4 Comments